---
url: /docs/index.md
---
# Introduction
A collection of on-device AI primitives for React Native with first-class Vercel AI SDK support. Run AI models directly on users' devices for privacy-preserving, low-latency inference without server costs.
## Why On-Device AI?
- **Privacy-first:** All processing happens locally - no data leaves the device
- **Instant responses:** No network latency, immediate AI capabilities
- **Offline-ready:** Works anywhere, even without internet
- **Zero server costs:** No API fees or infrastructure to maintain
## DevTools
The AI SDK Profiler plugin captures OpenTelemetry spans from Vercel AI SDK
requests and surfaces them in Rozenite DevTools. DevTools are runtime
agnostic, so they work with on-device and remote runtimes.
Learn more in the [DevTools documentation](./dev-tools).
## Available Providers
### Apple Intelligence
Native integration with Apple's on-device AI capabilities through `@react-native-ai/apple`:
- **Text Generation** - Apple Foundation Models for chat and completion
- **Embeddings** - NLContextualEmbedding for semantic search and similarity
- **Transcription** - SpeechAnalyzer for fast, accurate speech-to-text
- **Speech Synthesis** - AVSpeechSynthesizer for natural text-to-speech
Production-ready with instant availability on supported iOS devices.
### Google ADK
Run Gemini Nano on-device on Android using Google's Agent Development Kit through `@react-native-ai/adk`. Gemini Nano is system-provisioned via AICore - no API key, no model files to bundle. Cloud Gemini is also available when you need a larger model.
- **On-device Gemini Nano** - Private, offline-capable inference via ML Kit GenAI, provisioned by the system
- **Cloud Gemini** — Optional cloud inference via ADK `LlmAgent` and Google AI API
- **Tool calling** - Native ADK agent loop with JavaScript tool executors
- **Streaming** - Real-time text and tool-call stream parts
Android-only. See the [ADK docs](./adk/getting-started) for setup and API details.
### Llama Engine
Run any GGUF model from HuggingFace locally using `llama.rn` through `@react-native-ai/llama`:
- **Text Generation** - High-performance GGUF inference with full streaming support
- **Model Management** - Automatic downloading and caching from HuggingFace
- **Customizable** - Support for context size, threads, and GGUF-specific parameters
Cross-platform parity with optimized performance on both iOS and Android.
### MLC Engine (Work in Progress)
Run any open-source LLM locally using MLC's optimized runtime through `@react-native-ai/mlc`:
- Support for popular models like Llama, Mistral, and Phi
- Cross-platform compatibility (iOS and Android)
> [!NOTE]
> MLC support is experimental and not recommended for production use yet.
### JSON UI
Build UIs from tool-calling models with `@react-native-ai/json-ui`:
- **Tool-based spec** - Model calls tools to add/set/delete nodes and props
- **GenerativeUIView** - Renders the spec in React Native; override styles or supply a custom node renderer
- **Small-model friendly** - Designed for on-device models with limited context
See the [JSON UI docs](./json-ui/getting-started) for setup and API.
Get started by choosing the approach that fits your needs!
---
url: /docs/polyfills.md
---
import { PackageManagerTabs } from '@theme'
# Polyfills
Several functions that are internally used by the AI SDK might not be available in the React Native runtime depending on your configuration and the target platform.
## Expo
First, install the following packages:
Then create a new file in the root of your project with the following polyfills:
```js title="polyfills.js"
import { Platform } from 'react-native'
import structuredClone from '@ungap/structured-clone'
if (Platform.OS !== 'web') {
const setupPolyfills = async () => {
const { polyfillGlobal } =
await import('react-native/Libraries/Utilities/PolyfillFunctions')
const { TextEncoderStream, TextDecoderStream } =
await import('@stardazed/streams-text-encoding')
if (!('structuredClone' in global)) {
polyfillGlobal('structuredClone', () => structuredClone)
}
polyfillGlobal('TextEncoderStream', () => TextEncoderStream)
polyfillGlobal('TextDecoderStream', () => TextDecoderStream)
}
setupPolyfills()
}
export {}
```
Make sure to import this file early in your app's entry point (e.g., at the top of your `App.tsx` or `index.js`):
```js
import './polyfills'
```
## Bare React Native
For projects not using Expo, you'll need additional stream polyfills since Expo provides some of these out of the box.
First, install the following packages:
Then create a new file in the root of your project with the following polyfills:
```js title="polyfills.js"
import { Platform } from 'react-native'
import structuredClone from '@ungap/structured-clone'
import {
TransformStream,
ReadableStream,
WritableStream,
} from 'web-streams-polyfill'
if (Platform.OS !== 'web') {
const setupPolyfills = async () => {
const { polyfillGlobal } =
await import('react-native/Libraries/Utilities/PolyfillFunctions')
const { TextEncoderStream, TextDecoderStream } =
await import('@stardazed/streams-text-encoding')
if (!('structuredClone' in global)) {
polyfillGlobal('structuredClone', () => structuredClone)
}
if (!('TransformStream' in global)) {
polyfillGlobal('TransformStream', () => TransformStream)
}
if (!('ReadableStream' in global)) {
polyfillGlobal('ReadableStream', () => ReadableStream)
}
if (!('WritableStream' in global)) {
polyfillGlobal('WritableStream', () => WritableStream)
}
polyfillGlobal('TextEncoderStream', () => TextEncoderStream)
polyfillGlobal('TextDecoderStream', () => TextDecoderStream)
}
setupPolyfills()
}
export {}
```
Make sure to import this file early in your app's entry point (e.g., at the top of your `App.tsx` or `index.js`):
```js
import './polyfills'
```
---
url: /docs/dev-tools.md
---
# AI SDK Profiler DevTools
A Rozenite plugin that captures Vercel AI SDK spans and surfaces them in
Rozenite DevTools. Inspect requests, inputs, outputs, provider metadata, and
latency.
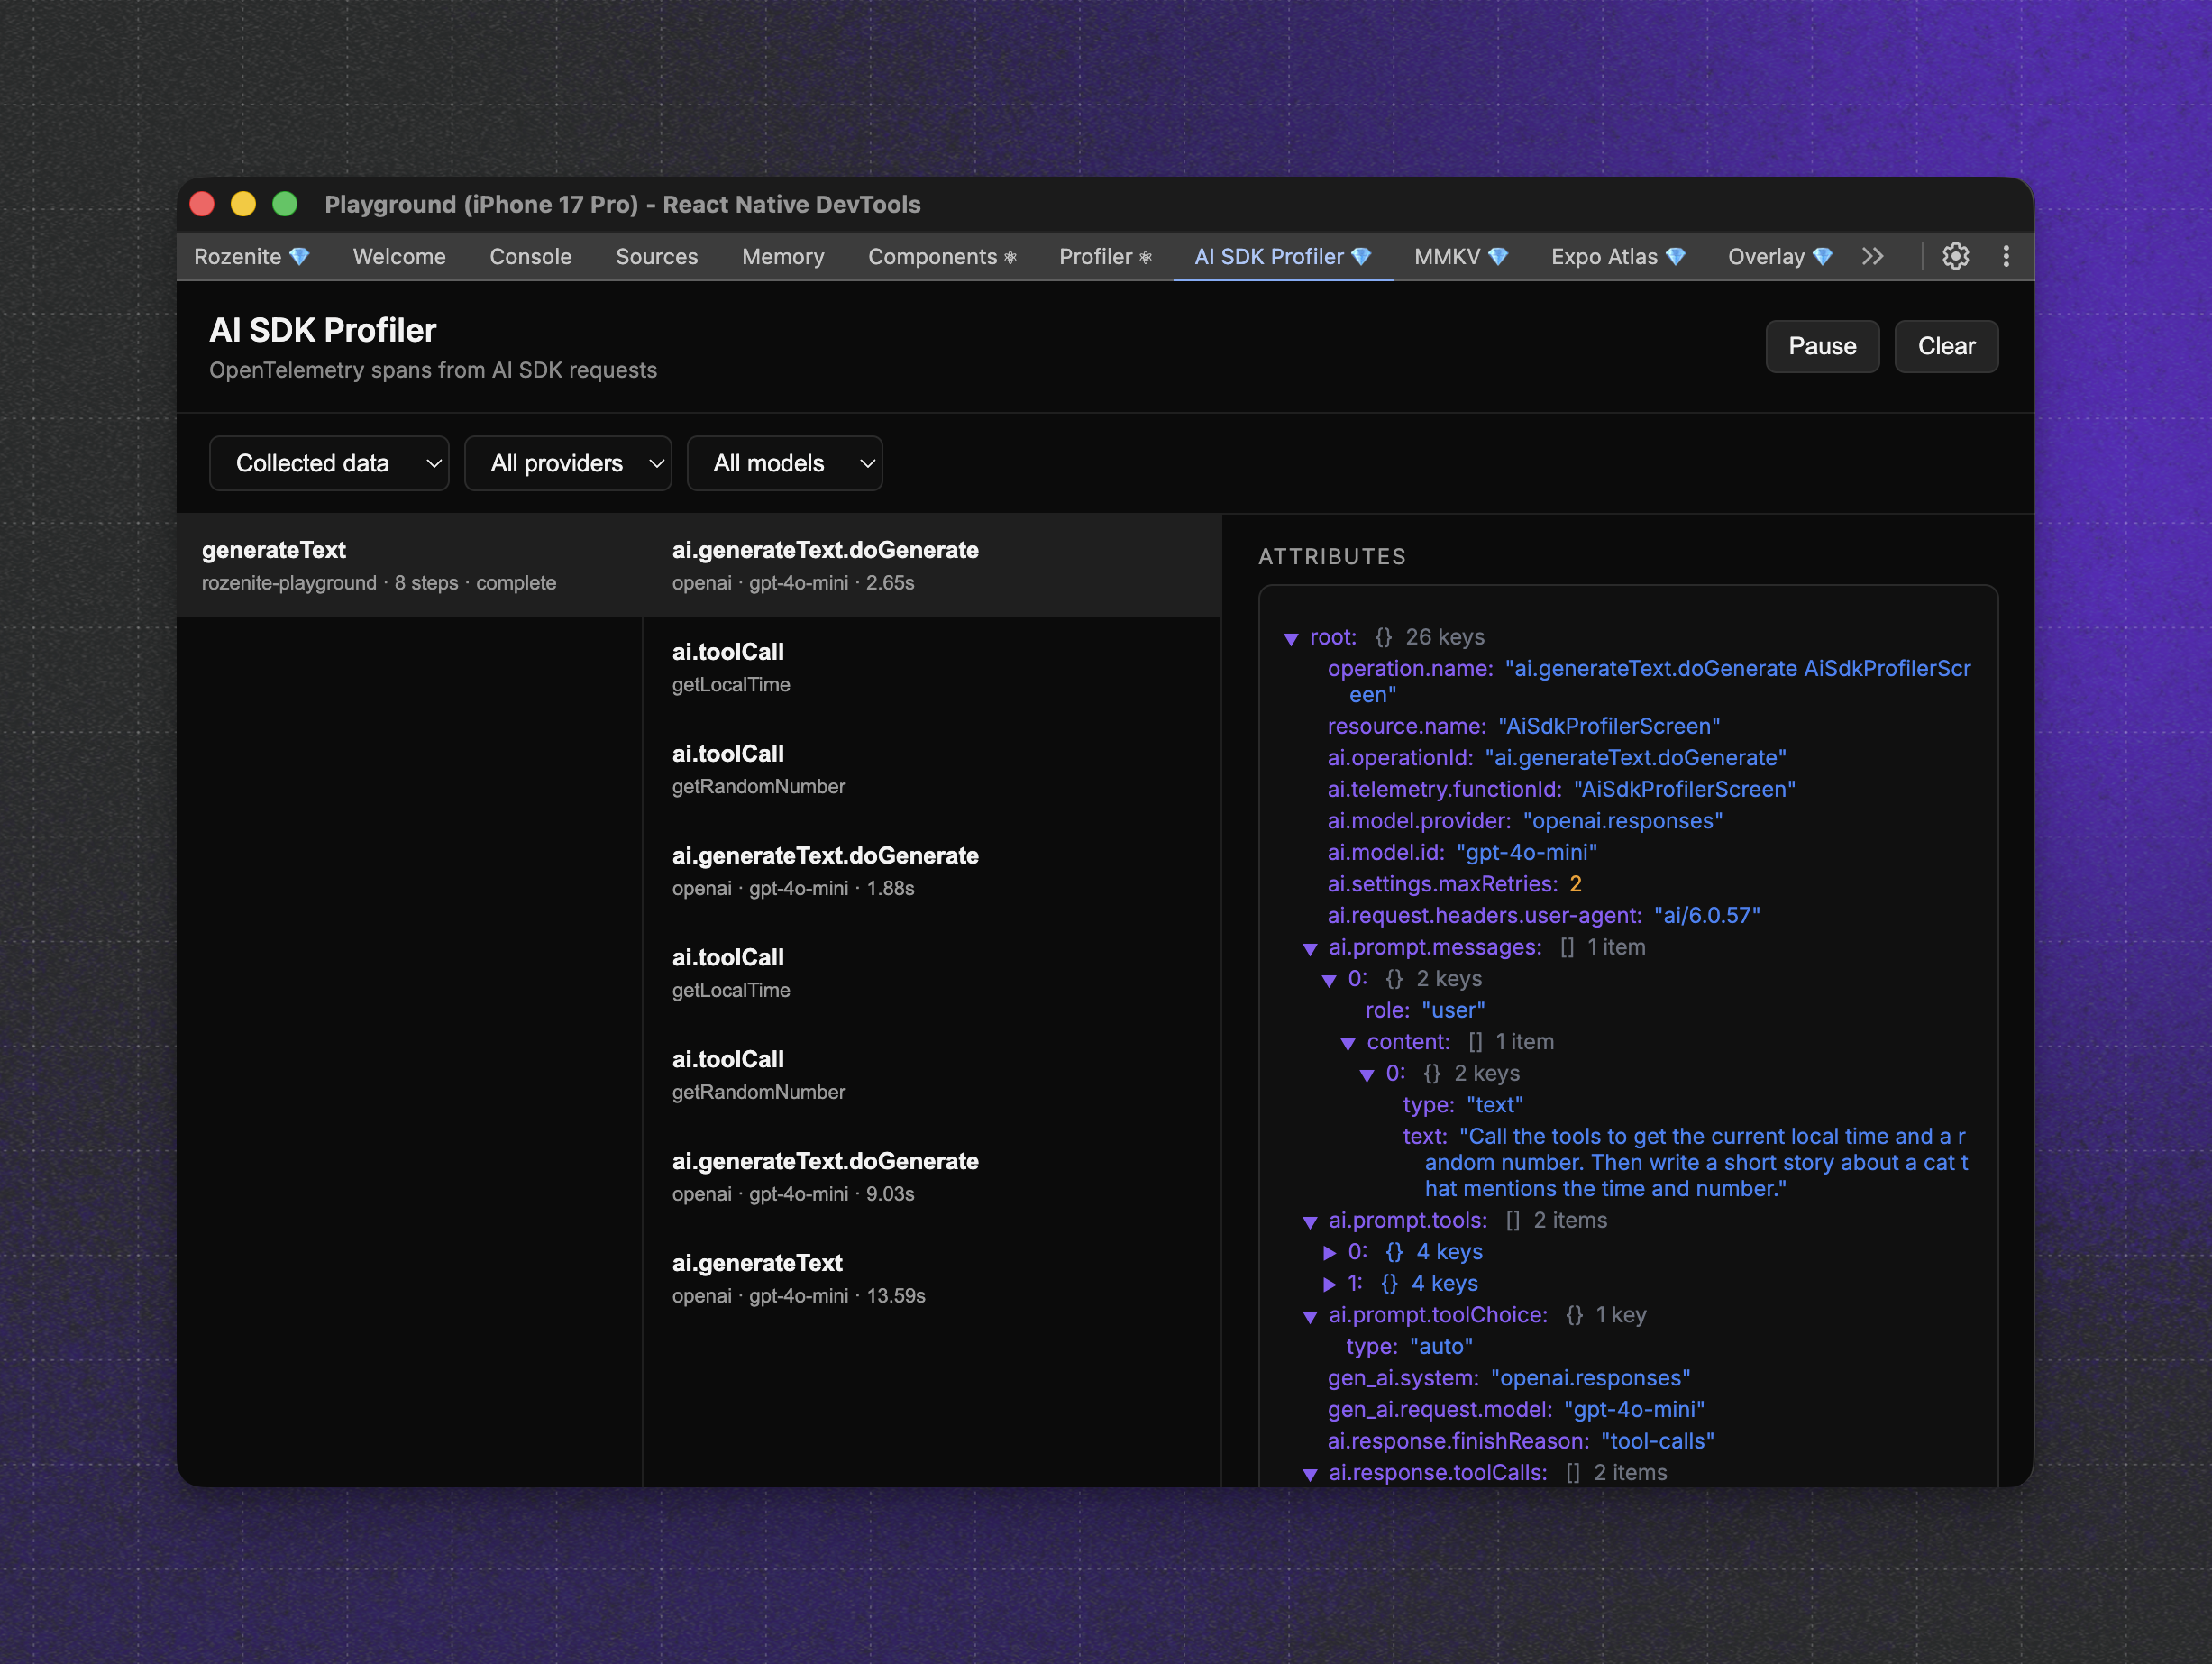
DevTools are runtime agnostic, so they work with on-device and remote runtimes.
## Installation
```bash
npm install @react-native-ai/dev-tools
```
## Rozenite setup
This plugin requires Rozenite to be installed and enabled in your app.
Follow the Rozenite getting started guide to install and configure it:
https://www.rozenite.dev/docs/getting-started
## Quick Start
### 1. Initialize the tracer and DevTools hook
```tsx
import {
getAiSdkTracer,
useAiSdkDevTools,
} from '@react-native-ai/dev-tools';
export function App() {
useAiSdkDevTools();
return ;
}
```
### 2. Enable AI SDK telemetry on requests
```ts
import { generateText } from 'ai';
import { openai } from '@ai-sdk/openai';
import { getAiSdkTracer } from '@react-native-ai/dev-tools';
const tracer = getAiSdkTracer({
serviceName: 'my-app',
});
await generateText({
model: openai('gpt-4o-mini'),
prompt: 'Write a short story about a cat.',
experimental_telemetry: {
isEnabled: true,
tracer,
functionId: 'unique-identifier-where-the-call-comes-from',
},
});
```
### 3. Open DevTools
Start your development server and open Rozenite DevTools. Select
**AI SDK Profiler** to inspect the spans.
---
url: /docs/apple/getting-started.md
---
import { PackageManagerTabs } from '@theme'
# Getting Started
The Apple provider enables you to use Apple's on-device AI capabilities with the Vercel AI SDK in React Native applications. This includes language models, text embeddings, and other Apple-provided AI features that run entirely on-device for privacy and performance.
## Installation
Install the Apple provider:
While you can use the Apple provider standalone, we recommend using it with the Vercel AI SDK for a much better developer experience. The AI SDK provides unified APIs, streaming support, and advanced features. To use with the AI SDK, you'll need v5+ and [required polyfills](../polyfills.md):
## Requirements
- **React Native New Architecture** - Required for native module functionality
> [!NOTE]
> Different Apple AI features have varying iOS version requirements. Check the specific API documentation for compatibility details.
## Running on Simulator
To use Apple Intelligence with the iOS Simulator, you need to enable it on your macOS system first. See the [Running on Simulator](./running-on-simulator) guide for detailed setup instructions.
## Basic Usage
Import the Apple provider and use it with the AI SDK:
```typescript
import { apple } from '@react-native-ai/apple'
import { generateText } from 'ai'
const result = await generateText({
model: apple(),
prompt: 'Explain quantum computing in simple terms',
})
```
---
url: /docs/apple/generating.md
---
# Generating
You can generate response using Apple Foundation Models with the Vercel AI SDK's `generateText` or `generateObject` function.
## Requirements
- **iOS 26+** - Apple Foundation Models is available in iOS 26 or later
- **Apple Intelligence enabled device** - Device must support Apple Intelligence
## Text Generation
```typescript
import { apple } from '@react-native-ai/apple';
import { generateText } from 'ai';
const result = await generateText({
model: apple(),
prompt: 'Explain quantum computing in simple terms'
});
```
## Streaming
```typescript
import { streamText } from 'ai';
import { apple } from '@react-native-ai/apple';
const { textStream } = await streamText({
model: apple(),
prompt: 'Write me a short essay on the meaning of life'
});
for await (const delta of textStream) {
console.log(delta);
}
```
> [!NOTE]
> Streaming objects is currently not supported.
## Structured Output
Generate structured data that conforms to a specific schema:
```typescript
import { generateObject } from 'ai';
import { apple } from '@react-native-ai/apple';
import { z } from 'zod';
const schema = z.object({
name: z.string(),
age: z.number().int().min(0).max(150),
email: z.string().email(),
occupation: z.string()
});
const result = await generateObject({
model: apple(),
prompt: 'Generate a user profile for a software developer',
schema
});
console.log(result.object);
// { name: string, age: number, email: string, occupation: string }
```
## Tool Calling
Enable Apple Foundation Models to use custom tools in your React Native applications.
### Important Apple-Specific Behavior
Tools are executed by Apple, not the Vercel AI SDK, which means:
- **No AI SDK callbacks**: `maxSteps`, `onStepStart`, and `onStepFinish` will not be executed
- **Pre-register all tools**: You must pass all tools to `createAppleProvider` upfront
- **Empty toolCallId**: Apple doesn't provide tool call IDs, so they will be empty strings
### Setup
All tools must be registered ahead of time with Apple provider. To do so, you must create one by calling `createAppleProvider`:
```typescript
import { createAppleProvider } from '@react-native-ai/apple';
import { generateText, tool } from 'ai';
import { z } from 'zod';
const getWeather = tool({
description: 'Get current weather information',
inputSchema: z.object({
city: z.string()
}),
execute: async ({ city }) => {
return `Weather in ${city}: Sunny, 25°C`;
}
});
const apple = createAppleProvider({
availableTools: {
getWeather
}
});
```
If you want to change the tools at runtime, you can do it as follows:
```typescript
const apple = createAppleProvider({
availableTools: {
getWeather
}
});
const model = apple();
model.updateTools({
getWeather,
getDate
});
```
### Basic Tool Usage
Then, generate output like with any other Vercel AI SDK provider:
```typescript
const result = await generateText({
model: apple(),
prompt: 'What is the weather in Paris?',
tools: {
getWeather
}
});
```
### Inspecting Tool Calls
You can inspect tool calls and their results after generation:
```typescript
const result = await generateText({
model: apple(),
prompt: 'What is the weather in Paris?',
tools: { getWeather }
});
// Inspect tool calls made during generation
console.log(result.toolCalls);
// Example: [{ toolCallId: '<< redacted >>', toolName: 'getWeather', input: '{"city":"Paris"}' }]
// Inspect tool results returned
console.log(result.toolResults);
// Example: [{ toolCallId: '<< redacted >>', toolName: 'getWeather', result: 'Weather in Paris: Sunny, 25°C' }]
```
### Tool calling with structured output
You can also use [`experimental_output`](https://v5.ai-sdk.dev/docs/reference/ai-sdk-core/generate-text#experimental_output) to generate structured output with `generateText`. This is useful when you want to perform tool calls at the same time.
```typescript
const response = await generateText({
model: apple(),
system: `Help the person with getting weather information.`,
prompt: 'What is the weather in Wroclaw?',
tools: {
getWeather,
},
experimental_output: Output.object({
schema: z.object({
weather: z.string(),
city: z.string(),
}),
}),
})
```
### Supported features
We aim to cover most of the OpenAI supported formats, including the following:
- **Objects**: `z.object({})` with nested properties
- **Arrays**: `z.array()` with `minItems` and `maxItems` constraints
- **Strings**: `z.string()`
- **Numbers**: `z.number()` with `minimum`, `maximum`, `exclusiveMinimum`, `exclusiveMaximum`
- **Booleans**: `z.boolean()`
- **Enums**: `z.enum([])` for string and number values
The following features are currently not supported due to underlying model limitations:
- **String formats**: `email()`, `url()`, `uuid()`, `datetime()` etc.
- **Regular expressions**: Due to a
- **Unions**: `z.union()`, `z.discriminatedUnion()`
## Availability Check
Always check if Apple Intelligence is available before using the provider:
```typescript
import { apple } from '@react-native-ai/apple';
if (!apple.isAvailable()) {
// Handle fallback logic
return;
}
```
## Context Window
Apple Foundation Models have a fixed context window of 4096 tokens. This limit applies to the full request context, including system instructions, previous conversation messages, tool definitions, schemas, and the current user prompt.
The `maxTokens` option only limits how many tokens the model can generate in its response. It does not increase the available context window or reserve enough room for a long prompt.
If the full context is too large, Apple may fail generation with a context-window overflow error. The provider does not automatically estimate tokens, remove messages from your prompt, or retry the request, because token estimates can vary by language and different apps need different memory strategies. Handle this at the application level by catching the error and choosing the recovery behavior that fits your product:
- Start a new conversation without the previous transcript, which is Apple's recommended baseline after this error
- Keep a sliding window of recent messages
- Summarize older messages and include the summary instead of the full transcript
- Ask the user to shorten the prompt or start a new chat
```typescript
import {
AppleLLMErrorCodes,
type AppleLLMError,
apple,
} from '@react-native-ai/apple';
import { generateText } from 'ai';
try {
const result = await generateText({
model: apple(),
messages
});
} catch (error) {
const appleError = error as AppleLLMError;
if (appleError.code === AppleLLMErrorCodes.ContextWindowExceeded) {
// Apply your app's recovery strategy here.
// For example: retry with fewer messages or start a new chat.
}
throw error;
}
```
For streaming calls, use `fullStream` when you need to inspect provider error parts:
```typescript
import {
AppleLLMErrorCodes,
type AppleLLMError,
apple,
} from '@react-native-ai/apple';
import { streamText } from 'ai';
const result = streamText({
model: apple(),
messages
});
for await (const part of result.fullStream) {
if (part.type === 'error') {
const error = part.error as AppleLLMError;
if (error.code === AppleLLMErrorCodes.ContextWindowExceeded) {
// Apply your app's recovery strategy here.
}
}
}
```
If you only consume `textStream`, pass `onError` to `streamText`. The AI SDK does not emit error parts through the text-only stream, so capture the error there and handle it after the stream finishes:
```typescript
import {
AppleLLMErrorCodes,
type AppleLLMError,
apple,
} from '@react-native-ai/apple';
import { streamText } from 'ai';
let streamError: unknown;
const result = streamText({
model: apple(),
messages,
onError: ({ error }) => {
streamError = error;
},
});
for await (const delta of result.textStream) {
console.log(delta);
}
if (streamError) {
const error = streamError as AppleLLMError;
if (error.code === AppleLLMErrorCodes.ContextWindowExceeded) {
// Apply your app's recovery strategy here.
}
throw streamError;
}
```
## Public Error Codes
Apple Foundation Models exposes a deliberate public error-code surface through `AppleLLMError.code`. Use `error.code` for application control flow and treat `error.message` as display/debug text rather than a compatibility contract.
Only documented `AppleLLMErrorCodes.*` values are stable:
- `AppleLLMErrorCodes.ModelUnavailable` / `MODEL_UNAVAILABLE`
- `AppleLLMErrorCodes.UnsupportedOS` / `UNSUPPORTED_OS`
- `AppleLLMErrorCodes.GenerationError` / `GENERATION_ERROR`
- `AppleLLMErrorCodes.InvalidMessage` / `INVALID_MESSAGE`
- `AppleLLMErrorCodes.ConflictingSamplingMethods` / `CONFLICTING_SAMPLING_METHODS`
- `AppleLLMErrorCodes.InvalidSchema` / `INVALID_SCHEMA`
- `AppleLLMErrorCodes.ToolCallError` / `TOOL_CALL_ERROR`
- `AppleLLMErrorCodes.UnknownToolCallError` / `UNKNOWN_TOOL_CALL_ERROR`
- `AppleLLMErrorCodes.ContextWindowExceeded` / `CONTEXT_WINDOW_EXCEEDED`
These codes mean:
- `MODEL_UNAVAILABLE`: Apple Intelligence is unavailable on the current device or configuration.
- `UNSUPPORTED_OS`: the current runtime does not support the required Apple Foundation Models API.
- `GENERATION_ERROR`: Foundation Models generation failed for an uncategorized provider-side reason.
- `INVALID_MESSAGE`: the prompt/message structure is invalid for this provider.
- `CONFLICTING_SAMPLING_METHODS`: both `topP` and `topK` were provided.
- `INVALID_SCHEMA`: the provided schema or tool schema cannot be used by Apple Foundation Models.
- `TOOL_CALL_ERROR`: a tool execution failed.
- `UNKNOWN_TOOL_CALL_ERROR`: tool execution finished in an unusable or unexpected state.
- `CONTEXT_WINDOW_EXCEEDED`: the request exceeded the model context window.
Errors that do not have a recognized public Apple LLM code may still be thrown, but they are plain `Error` values and are not part of the stable Apple provider API.
### Handling `generateText` errors
```typescript
import {
AppleLLMErrorCodes,
type AppleLLMError,
apple,
} from '@react-native-ai/apple';
import { generateText } from 'ai';
try {
await generateText({
model: apple(),
messages,
})
} catch (error) {
if (
error instanceof Error &&
'code' in error &&
error.code === AppleLLMErrorCodes.ModelUnavailable
) {
// Show fallback UI or disable Apple-specific features.
}
throw error
}
```
### Handling streaming errors with `fullStream`
```typescript
import {
AppleLLMErrorCodes,
type AppleLLMError,
apple,
} from '@react-native-ai/apple';
import { streamText } from 'ai';
const result = streamText({
model: apple(),
messages,
})
for await (const part of result.fullStream) {
if (
part.type === 'error' &&
part.error instanceof Error &&
'code' in part.error &&
part.error.code === AppleLLMErrorCodes.InvalidSchema
) {
// Handle invalid schema input.
}
}
```
### Handling streaming errors with `textStream` and `onError`
```typescript
import {
AppleLLMErrorCodes,
type AppleLLMError,
apple,
} from '@react-native-ai/apple';
import { streamText } from 'ai';
let streamError: unknown
const result = streamText({
model: apple(),
messages,
onError: ({ error }) => {
streamError = error
},
})
for await (const delta of result.textStream) {
console.log(delta)
}
if (
streamError instanceof Error &&
'code' in streamError &&
streamError.code === AppleLLMErrorCodes.ToolCallError
) {
// Handle tool failure.
}
```
## Available Options
Configure model behavior with generation options:
- `temperature` (0-1): Controls randomness. Higher values = more creative, lower = more focused
- `maxTokens`: Maximum number of tokens to generate
- `topP` (0-1): Nucleus sampling threshold
- `topK`: Top-K sampling parameter
You can pass selected options with either `generateText` or `generateObject` as follows:
```typescript
import { apple } from '@react-native-ai/apple';
import { generateText } from 'ai';
const result = await generateText({
model: apple(),
prompt: 'Write a creative story',
temperature: 0.8,
maxTokens: 500,
topP: 0.9,
});
```
## Direct API Access
For advanced use cases, you can access the native Apple Foundation Models API directly:
### AppleFoundationModels
```tsx
import { AppleFoundationModels } from '@react-native-ai/apple'
// Check if Apple Intelligence is available
const isAvailable = AppleFoundationModels.isAvailable()
// Generate text responses
const messages = [{ role: 'user', content: 'Hello' }]
const options = { temperature: 0.7, maxTokens: 100 }
const result = await AppleFoundationModels.generateText(messages, options)
```
On iOS 26.4 and newer, you can also count the number of tokens in a string
before sending it to the model:
```tsx
import { AppleFoundationModels } from '@react-native-ai/apple'
const tokenCount = await AppleFoundationModels.countTokens(
'Summarize this text in three bullet points.'
)
```
Token counting is useful for estimating prompt size, but it is not a complete
guarantee that a generation request will fit in the model context window. The
full context also includes instructions, previous messages in the transcript,
tools, schemas, and generated output.
The maximum context window size for Apple's Foundation models is 4096 tokens
per session. More information can be found [here](https://developer.apple.com/documentation/technotes/tn3193-managing-the-on-device-foundation-model-s-context-window).
---
url: /docs/apple/embeddings.md
---
# Embeddings
Generate text embeddings using Apple's on-device NLContextualEmbedding model with the AI SDK.
## Overview
This provider uses Apple's [`NLContextualEmbedding`](https://developer.apple.com/documentation/naturallanguage/nlcontextualembedding) to generate contextual text embeddings entirely on-device. This is Apple's implementation of a BERT-like transformer model integrated into iOS 17+, providing privacy-preserving text understanding capabilities.
## Model Architecture
NLContextualEmbedding uses a transformer-based architecture trained with masked language modeling (similar to BERT). Apple provides three optimized models grouped by writing system:
- **Latin Script Model** (20 languages): English, Spanish, French, German, Italian, Portuguese, Dutch, and others - produces 512-dimensional embeddings
- **Cyrillic Script Model** (4 languages): Russian, Ukrainian, Bulgarian, Serbian
- **CJK Model** (3 languages): Chinese, Japanese, Korean
Each model is multilingual within its script family, enabling cross-lingual semantic understanding. The models are compressed and optimized for Apple's Neural Engine, typically under 100MB when downloaded.
## Requirements
- **iOS 17+** - NLContextualEmbedding requires iOS 17 or later
## Usage
### Single Text
```tsx
import { embed } from 'ai'
import { apple } from '@react-native-ai/apple'
const { embedding } = await embed({
model: apple.textEmbeddingModel(),
value: 'Hello world',
})
console.log(embedding)
```
### Multiple Texts
```tsx
import { embedMany } from 'ai'
import { apple } from '@react-native-ai/apple'
const { embeddings } = await embedMany({
model: apple.textEmbeddingModel(),
values: ['Hello world', 'How are you?', 'Goodbye'],
})
console.log(embeddings)
```
## Language Support
The embeddings model supports multiple languages. You can specify the language using [ISO 639-1 codes](https://en.wikipedia.org/wiki/List_of_ISO_639_language_codes) or full names when creating the model:
```tsx
const model = apple.textEmbeddingModel({ language: 'fr' })
await embed({
model,
value: 'Bonjour',
})
```
For list of all supported languages, [check Apple documentation](https://developer.apple.com/documentation/naturallanguage/nlcontextualembedding#overview).
> [!NOTE]
> By default, the embeddings model will use device language.
## Preparing the Model
Apple's NLContextualEmbedding requires downloading language-specific assets to the device. While the provider automatically prepares assets when needed, you can call `prepare()` ahead of time for better performance:
```tsx
const model = apple.textEmbeddingModel({ language: 'en' })
// Call prepare() ahead of time to optimize first inference latency
await model.prepare()
// Now embeddings will be faster on first use
const { embedding } = await embed({ model, value: 'Hello world' })
```
> [!TIP]
> Calling `prepare()` ahead of time is recommended to avoid delays on first use. If not called, the model will auto-prepare when first used, but a warning will be logged.
When you call `prepare()`, the system first checks if the required assets are already present on the device. If they are, the method resolves immediately without any network activity.
> [!NOTE]
> All language models and assets are stored in Apple's system-wide assets catalog, separate from your app bundle. This means zero impact on your app's size. Assets may already be available if the user has previously used other apps, or if system features have requested them.
## Direct API Access
For advanced use cases, you can access the embeddings API directly:
### AppleEmbeddings
```tsx
import { AppleEmbeddings } from '@react-native-ai/apple'
// Get embedding model information
const modelInfo: EmbeddingInfo = await AppleEmbeddings.getInfo(language: string)
// Prepare language assets
await AppleEmbeddings.prepare(language: string)
// Generate embeddings
const embeddings = await AppleEmbeddings.generateEmbeddings(
values: string[],
language: string
): Promise
export interface EmbeddingInfo {
hasAvailableAssets: boolean
dimension: number
languages: string[]
maximumSequenceLength: number
modelIdentifier: string
revision: number
scripts: string[]
}
```
## Benchmarks
Performance results showing processing time in milliseconds per embedding across different text lengths:
| Device | Short (~10 tokens) | Medium (~30 tokens) | Long (~90 tokens) |
|----------------|--------------------|----------------------|-------------------|
| iPhone 16 Pro | 19.19 | 21.53 | 33.59 |
Each category is tested with 5 consecutive runs to calculate reliable averages and account for system variability.
---
url: /docs/apple/transcription.md
---
# Transcription
Convert speech to text using Apple's on-device `SpeechAnalyzer` and `SpeechTranscriber`.
## Overview
This provider uses Apple's [`SpeechAnalyzer`](https://developer.apple.com/documentation/speech/speechanalyzer) and [`SpeechTranscriber`](https://developer.apple.com/documentation/speech/speechtranscriber) to perform speech-to-text transcription entirely on-device. This is Apple's new advanced speech recognition model and is available in iOS 26 and onwards.
## Requirements
- **iOS 26+** - SpeechAnalyzer requires iOS 26
## Usage
### Basic Transcription
```tsx
const file = await fetch(
'https://www.voiptroubleshooter.com/open_speech/american/OSR_us_000_0010_8k.wav'
)
const audio = await file.arrayBuffer()
const response = await experimental_transcribe({
model: apple.transcriptionModel(),
audio,
})
console.log(response.text)
console.log(response.segments)
console.log(response.durationInSeconds)
```
The `audio` parameter accepts either an `ArrayBuffer` or a base64-encoded string.
> [!NOTE]
> The API currently does not support streaming or live transcription. It is relatively easy to include, please let us know on Github if you need support for this.
## Language Support
The transcription model supports multiple languages with automatic language detection. You can configure a custom language when creating the model:
```tsx
const model = apple.transcriptionModel({ language: 'fr' })
await experimental_transcribe({
model,
audio: audioArrayBuffer,
})
```
> [!NOTE]
> By default, the transcription model will use device language.
## Preparing the Model
Apple's SpeechAnalyzer requires downloading language-specific assets to the device. While the provider automatically prepares assets when needed, you can call `prepare()` ahead of time for better performance:
```tsx
const model = apple.transcriptionModel({ language: 'en' })
// Call prepare() ahead of time to optimize first inference latency
await model.prepare()
// Now transcription will be faster on first use
const response = await experimental_transcribe({ model, audio })
```
> [!TIP]
> Calling `prepare()` ahead of time is recommended to avoid delays on first use. If not called, the model will auto-prepare when first used, but a warning will be logged.
When you call `prepare()`, the system first checks if the required assets are already present on the device. If they are, the method resolves immediately without any network activity.
> [!NOTE]
> All language models and assets are stored in Apple's system-wide assets catalog, separate from your app bundle. This means zero impact on your app's size. Assets may already be available if the user has previously used other apps, or if system features have requested them.
## Direct API Access
For advanced use cases, you can access the speech transcription API directly:
### AppleTranscription
```tsx
import { AppleTranscription } from '@react-native-ai/apple'
// Check availability for a language
const isAvailable: boolean = await AppleTranscription.isAvailable(language: string)
// Prepare language assets
await AppleTranscription.prepare(language: string)
// Transcribe audio with timing information
const { segments, duration } = await AppleTranscription.transcribe(
arrayBuffer,
language: string
)
```
## Benchmarks
Performance comparison showing transcription speed for a 34-minute audio file ([source](https://www.macrumors.com/2025/06/18/apple-transcription-api-faster-than-whisper/)):
| System | Processing Time | Performance |
| ------------------------- | ------------------- | ----------- |
| Apple SpeechAnalyzer | 45 seconds | Baseline |
| MacWhisper Large V3 Turbo | 1 minute 41 seconds | 2.2× slower |
---
url: /docs/apple/speech.md
---
# Speech
Convert text to speech using Apple's on-device speech synthesis capabilities.
## Overview
This provider uses Apple's [`AVSpeechSynthesizer`](https://developer.apple.com/documentation/avfaudio/avspeechsynthesizer) to perform text-to-speech entirely on-device. Audio is synthesized locally and returned to your app as a WAV byte stream.
## Requirements
- **iOS 13+** – Required for programmatic audio rendering with `AVSpeechSynthesizer.write(...)`.
- **iOS 17+** – Required to use Personal Voice if available on device.
## Usage
### Basic Speech
```tsx
import { apple } from '@react-native-ai/apple'
import { experimental_generateSpeech as speech } from 'ai'
const response = await speech({
model: apple.speechModel(),
text: 'Hello from Apple on-device speech!',
})
// Access the buffer in a preferred way
console.log(response.audio.uint8Array)
console.log(response.audio.base64)
```
> [!NOTE]
> Sample rate and bit depth are determined by the system voice (commonly 44.1 kHz, 16‑bit PCM; some devices may return 32‑bit float which is encoded accordingly in the WAV header).
### Language and Voice Selection
You can control the output language or select a specific voice by identifier. To see what voices are available on the device:
```tsx
import { AppleSpeech } from '@react-native-ai/apple'
const voices = await AppleSpeech.getVoices()
```
Use a specific voice by passing its `identifier`:
```tsx
await speech({
model: apple.speechModel(),
text: 'Custom voice synthesis',
voice: 'com.apple.voice.super-compact.en-US.Samantha',
})
```
Or specify only `language` to use the system’s default voice for that locale:
```tsx
await speech({
model: apple.speechModel(),
text: 'Bonjour tout le monde!',
language: 'en-US',
})
```
> [!NOTE]
> If both `voice` and `language` are provided, `voice` takes priority.
> [!NOTE]
> If only `language` is provided, the default system voice for that locale is used.
## Voices and Asset Management
The system provides a catalog of built‑in voices, including enhanced and premium variants, which may require a one‑time system download. If you have created a Personal Voice on device (iOS 17+), it appears in the list and is flagged accordingly.
> [!NOTE]
> Voice assets are managed by the operating system. To add or manage voices, use iOS Settings → Accessibility → Read & Speak → Voices. This provider does not bundle or manage voice downloads.
## Direct API Access
For advanced use cases, you can access the speech API directly:
### AppleSpeech
```tsx
import { AppleSpeech } from '@react-native-ai/apple'
// List available voices (identifier, name, language, quality, traits)
const voices = await AppleSpeech.getVoices()
// Generate audio as an ArrayBuffer-like WAV payload
const buffer = await AppleSpeech.generate('Hello world', {
language: 'en-US',
})
// Convert to Uint8Array if needed
```
Returned voice objects include:
- `identifier`: string
- `name`: string
- `language`: BCP‑47 code, e.g. `en-US`
- `quality`: `default` | `enhanced` | `premium`
- `isPersonalVoice`: boolean (iOS 17+)
- `isNoveltyVoice`: boolean (iOS 17+)
> [!NOTE]
> On iOS 17+, the provider requests Personal Voice authorization before listing voices so your Personal Voice can be surfaced if available.
---
url: /docs/apple/running-on-simulator.md
---
# Running on Simulator
This guide helps you configure Apple Intelligence to work with the iOS Simulator in your React Native applications.
Apple Intelligence must be enabled on your macOS system before it can be used in the iOS Simulator. Follow these steps to ensure proper configuration.
## Prerequisites
Before running Apple Intelligence on the simulator, verify your macOS settings are correctly configured.
## Step 1: Check Language Settings
Apple Intelligence and Siri must use the same language. To configure this:
1. Open **System Settings** > **Apple Intelligence & Siri**
2. Verify that both **Apple Intelligence** and **Siri** are set to the **same language**
3. If the languages don't match, update them to use the same language
## Step 2: Set Your Region
Apple Intelligence is only available in certain regions. To enable it:
1. Open **System Settings** > **General** > **Language & Region**
2. Set your **Region** to **United States** or another Apple Intelligence-supported region
3. Restart your Mac if prompted
After changing your region to a supported location, the Apple Intelligence toggle should appear in your system settings.
> [!NOTE]
> United States is one of the supported regions, but Apple Intelligence may be available in other regions as well. Check Apple's official documentation for the complete list of supported regions.
## Step 3: Enable Apple Intelligence
Once your language and region are configured:
1. Open **System Settings** > **Apple Intelligence & Siri**
2. Toggle on **Apple Intelligence**
3. macOS will begin downloading the required models
4. Wait for the download to complete before testing in the simulator
> [!NOTE]
> The model download may take several minutes depending on your internet connection. Ensure you have sufficient disk space available.
## Step 4: Verify Simulator Access
After enabling Apple Intelligence on macOS:
1. Launch your iOS Simulator
2. The simulator will inherit Apple Intelligence capabilities from your Mac
3. Test your application to confirm Apple Foundation Models are accessible
## Common Issues
### Apple Intelligence Toggle Not Visible
If you don't see the Apple Intelligence toggle in System Settings:
- Verify your Mac supports Apple Intelligence (Apple Silicon required)
- Ensure your macOS version is up to date
- Confirm your region is set to a supported location
- Check that both Siri and Apple Intelligence language settings match
### Models Not Working in Simulator
If Apple Intelligence is enabled but models aren't working:
- Ensure the model download completed successfully on macOS
- Restart the iOS Simulator
- Verify that `apple.isAvailable()` returns `true` in your code (see [Availability Check](./generating#availability-check))
- Check that your app is running on iOS 26+ in the simulator
## API Availability
Always check if Apple Intelligence is available before using it in your application. See the [Availability Check](./generating#availability-check) section in the Generating guide for details on how to implement this check.
---
url: /docs/adk/getting-started.md
---
import { PackageManagerTabs } from '@theme'
# Getting Started
The ADK provider brings on-device Gemini Nano to Android React Native apps through [Google's Agent Development Kit (ADK)](https://developer.android.com/ai/adk) and the Vercel AI SDK. Gemini Nano runs locally via ML Kit GenAI - provisioned by the Android system through AICore, with no API key and no model files to bundle. You also get cloud Gemini as an option when you need a larger model or broader device support.
## Installation
Install the ADK provider:
While you can use the ADK provider standalone, we recommend using it with the Vercel AI SDK for a much better developer experience. The AI SDK provides unified APIs, streaming support, and advanced features. To use with the AI SDK, you'll need v5+ and [required polyfills](../polyfills.md):
## Requirements
- **Android only** - The provider is not available on iOS or web
- **Android `minSdkVersion` 26 or greater** - Required by ML Kit GenAI / Gemini Nano
- **React Native New Architecture** - Required for native module functionality
- **React Native >= 0.76.0**
- **Gemini Nano** - A physical Android device with AICore support (Android 14+). See the [ML Kit GenAI documentation](https://developers.google.com/ml-kit/genai#feature-device) for device support details.
:::danger Gemini Nano - physical supported device required
Gemini Nano requires a physical Android device with AICore support and support for the Gemini Nano models. Please consult the [ML Kit GenAI documentation](https://developers.google.com/ml-kit/genai#feature-device).
Cloud Gemini works on all devices supported by ADK & MLKit when an API key is configured.
:::
## Integration with your app
Consuming apps must set `minSdkVersion` to at least 26. ADK pulls in Google GenAI libraries that duplicate `META-INF/INDEX.LIST`; exclude it in your app packaging via `expo-build-properties`:
### Expo Setup
```json
{
"expo": {
"plugins": [
[
"expo-build-properties",
{
"android": {
"minSdkVersion": 26,
"packagingOptions": {
"exclude": ["META-INF/INDEX.LIST", "META-INF/DEPENDENCIES"]
}
}
}
]
]
}
}
```
After changing CNG config, run:
```bash
npx expo prebuild --clean
```
### Bare React Native
Add the following to `android/app/build.gradle`:
```groovy
android {
packagingOptions {
excludes += ["META-INF/INDEX.LIST", "META-INF/DEPENDENCIES"]
}
}
```
Ensure your app's `minSdkVersion` is at least 26.
## Available Model Types
| Model Type | `modelType` | Default Name | Use Case |
| --------------------- | ------------ | ------------------ | ------------------------------------------------------------------ |
| On-device Gemini Nano | `genai-nano` | `gemini-nano` | Private, offline-capable inference - system-provisioned via AICore |
| Cloud Gemini | `gemini` | `gemini-2.5-flash` | Cloud inference via Google AI API |
## Basic Usage
Import the default ADK provider and call `adk()` to construct a language model, then pass it to the AI SDK. The default export targets on-device Gemini Nano (`gemini-nano`):
```typescript
import { adk } from '@react-native-ai/adk'
import { generateText } from 'ai'
const supported = await adk.isNanoSupported()
if (!supported) throw new Error('Gemini Nano not supported on this device')
const ready = await adk.isAvailable()
if (!ready) throw new Error('Gemini Nano not ready yet')
await adk.prepareNano()
const { text } = await generateText({
model: adk(),
prompt: 'Summarize on-device AI in one sentence.',
})
```
See [Cloud Gemini](#cloud-gemini) when you need cloud inference instead.
### On-device Gemini Nano
Gemini Nano runs locally via ML Kit GenAI and is provisioned by the Android system (AICore). The default `adk()` export already targets Nano — check availability and prepare before generating:
```typescript
import { adk } from '@react-native-ai/adk'
import { generateText } from 'ai'
const supported = await adk.isNanoSupported()
if (!supported) throw new Error('Gemini Nano not supported on this device')
const ready = await adk.isAvailable('genai-nano')
if (!ready) throw new Error('Gemini Nano not ready yet')
await adk.prepareNano()
const { text } = await generateText({
model: adk(),
prompt: 'Summarize on-device AI in one sentence.',
})
```
To customize the system instruction or register tool executors, create a provider with `createAdkProvider`:
```typescript
import { createAdkProvider } from '@react-native-ai/adk'
import { generateText } from 'ai'
const adk = createAdkProvider({
modelType: 'genai-nano',
modelName: 'gemini-nano',
instruction: 'You are a helpful assistant.',
})
await adk.prepareNano()
const { text } = await generateText({
model: adk(),
prompt: 'Summarize on-device AI in one sentence.',
})
```
#### Availability Check
Nano has two separate checks:
| API | Label | Question |
| ------------------------------- | --------------------- | ------------------------------------------ |
| `adk.isNanoSupported()` | **Device capability** | Can this device ever run Nano? |
| `adk.isAvailable('genai-nano')` | **Runtime readiness** | Can I call `prepareNano()` / generate now? |
If `isNanoSupported()` is `false`, `isAvailable('genai-nano')` is also `false`.
Both checks are cheap native calls (no model download), safe to cache at app startup and re-check after resume.
Both checks use ML Kit `Generation.getClient().checkStatus()`:
| Status | `isNanoSupported()` | `isAvailable('genai-nano')` | Suggested UX |
| -------------- | ------------------- | --------------------------- | ---------------------------------------- |
| `0` | `false` | `false` | Hide or disable - not supported |
| `1` | `true` | `true` | Ready - call `prepareNano()` |
| `3` | `true` | `true` | Ready to download - call `prepareNano()` |
| Other non-zero | `true` | `false` | Show disabled - not ready yet |
If needed, consult the [ML Kit GenAI Prompt API](https://developers.google.com/ml-kit/genai) for details.
#### Recommended Flow
```typescript
import { adk } from '@react-native-ai/adk'
const supported = await adk.isNanoSupported()
if (!supported) {
// Device lacks Gemini Nano / AICore support - hide from model picker
return
}
const ready = await adk.isAvailable('genai-nano')
if (!ready) {
// Device supports Nano but ML Kit is not ready yet (e.g. downloading)
// Show disabled - do not mark as "Ready"
return
}
await adk.prepareNano()
const model = adk()
```
#### Automatic Preparation
`model.prepare()`, `generateText()`, and `streamText()` auto-call `prepareNano()` for `genai-nano` models, but only gate on `isNanoSupported()`. For UI gating, always use `isAvailable('genai-nano')` and handle prepare/generation errors in your chat flow.
```typescript
import { adk } from '@react-native-ai/adk'
import { generateText } from 'ai'
const model = adk()
// Explicit prepare (initializes Nano via ML Kit)
await model.prepare()
// Or let generation trigger prepare automatically
await generateText({ model, prompt: 'Hello!' })
```
### Cloud Gemini
When you need cloud inference - for example on emulators or devices without AICore - create a provider with `modelType: 'gemini'` and an API key:
```typescript
import { createAdkProvider } from '@react-native-ai/adk'
import { generateText } from 'ai'
const adk = createAdkProvider({
apiKey: process.env.GOOGLE_API_KEY,
modelType: 'gemini',
modelName: 'gemini-2.5-flash',
})
const { text } = await generateText({
model: adk(),
prompt: 'What time is it in New York?',
})
```
To customize the system instruction or cloud model name:
```typescript
import { createAdkProvider } from '@react-native-ai/adk'
import { generateText } from 'ai'
const adk = createAdkProvider({
apiKey: process.env.GOOGLE_API_KEY,
modelType: 'gemini',
modelName: 'gemini-2.5-flash',
instruction: 'You are a helpful assistant.',
})
const { text } = await generateText({
model: adk(),
prompt: 'What time is it in New York?',
})
```
> Do not embed API keys in production client apps. Prefer a backend proxy or secure runtime configuration.
Cloud models do not require a separate download or prepare step.
### Custom provider (advanced)
Use `createAdkProvider` when you need to change the model type, agent name, system instruction, API key, or registered tool executors. It returns the same callable interface as the default `adk` export - call it to construct a language model:
```typescript
const adk = createAdkProvider({
name: 'my_agent',
description: 'A helpful assistant',
instruction: 'You are a concise, friendly assistant.',
modelType: 'genai-nano',
modelName: 'gemini-nano',
})
const model = adk()
// or
const model = adk.languageModel()
```
#### Provider Options
| Option | Type | Description |
| ---------------- | -------------------------- | --------------------------------------------------------------------------- |
| `name` | `string` | ADK agent name (default: `react_native_adk_agent`) |
| `description` | `string` | Agent description shown to ADK |
| `instruction` | `string` | System instruction for the agent |
| `modelType` | `'genai-nano' \| 'gemini'` | On-device or cloud backend (default: `genai-nano`) |
| `modelName` | `string` | Model identifier (default: `gemini-nano`; use `gemini-2.5-flash` for cloud) |
| `apiKey` | `string` | Google AI API key - required for cloud `gemini` only |
| `availableTools` | `Record` | Tools whose `execute` handlers ADK can call from JavaScript |
## Next Steps
See **[Generating](./generating.md)** for text generation, streaming, tool calling and multimodal input.
---
url: /docs/adk/generating.md
---
# Generating
You can generate responses using ADK with the Vercel AI SDK's `generateText` or `streamText` functions. ADK orchestrates the agent loop natively on Android while the provider bridges tool execution and streaming back to JavaScript. Import the default provider, call `adk()` to construct a language model, and pass it to the AI SDK — the default export targets on-device Gemini Nano.
## Requirements
- **Physical Android device with AICore** - Required for Gemini Nano; the device must be capable of running Gemini Nano. Please consult the [ML Kit GenAI documentation](https://developers.google.com/ml-kit/genai#feature-device). We provide runtime checks for this capability - please refer to [Getting Started - On-device Gemini Nano](./getting-started.mdx#on-device-gemini-nano).
- **Polyfills** - Streaming requires `ReadableStream`; see [Polyfills](../polyfills.md)
- **Prepare Nano** - Call `prepareNano()` or `model.prepare()` before first on-device use (see [Getting Started - On-device Gemini Nano](./getting-started.mdx#on-device-gemini-nano))
## Text Generation
```typescript
import { adk } from '@react-native-ai/adk'
import { generateText } from 'ai'
await adk.prepareNano()
const { text } = await generateText({
model: adk(),
prompt: 'Explain quantum computing in simple terms',
})
```
### Cloud Gemini
Cloud models use ADK's `LlmAgent` with Google's Gemini API. This is useful when Gemini Nano is unavailable, you need a more capable model, or you want to develop on an emulator without AICore. Create a provider with `modelType: 'gemini'` and an API key:
```typescript
import { createAdkProvider } from '@react-native-ai/adk'
import { generateText } from 'ai'
const adk = createAdkProvider({
modelType: 'gemini',
modelName: 'gemini-2.5-flash',
apiKey: process.env.GOOGLE_API_KEY,
})
const { text } = await generateText({
model: adk(),
prompt: 'Explain quantum computing in simple terms',
})
```
Cloud models do not require a separate download or prepare step.
> Do not embed API keys in production client apps. Prefer a backend proxy or secure runtime configuration.
## Streaming
Stream responses for real-time output:
```typescript
import { adk } from '@react-native-ai/adk'
import { streamText } from 'ai'
await adk.prepareNano()
const { textStream } = await streamText({
model: adk(),
prompt: 'Write a short story about a robot learning to paint',
})
for await (const delta of textStream) {
console.log(delta)
}
```
During streaming, the provider emits standard AI SDK stream parts: `text-start`, `text-delta`, `text-end`, and `finish` with usage metadata.
## Usage Metadata
ADK returns token usage in response events (`promptTokenCount`, `candidatesTokenCount`, `totalTokenCount`). The provider maps this into AI SDK `usage` on both `generateText` results and streaming `finish` events:
```typescript
import { adk } from '@react-native-ai/adk'
import { generateText } from 'ai'
await adk.prepareNano()
const { usage } = await generateText({
model: adk(),
prompt: 'Count to five.',
})
console.log(usage.inputTokens.total) // promptTokenCount
console.log(usage.outputTokens.total) // candidatesTokenCount
console.log(usage.raw?.totalTokenCount)
```
## Tool Calling
Enable ADK agents to call JavaScript tools during generation. Works on both on-device Nano and cloud Gemini.
### Important ADK-Specific Behavior
Tools are orchestrated by ADK natively, which means:
- **Pre-register executors**: Pass tools to `createAdkProvider` via `availableTools` so ADK can invoke their `execute` handlers
- **Provider-executed**: Streamed tool calls are marked with `providerExecuted: true`
- **Native agent loop**: ADK runs the multi-turn tool loop; AI SDK `maxSteps` does not control ADK's internal iteration
### Setup
ADK needs tool executors registered both in the AI SDK and on the provider. Use `createAdkProvider` with `availableTools`, then pass tools to the AI SDK and call `adk()` as usual. Example:
```typescript
import { createAdkProvider } from '@react-native-ai/adk'
import { generateText, tool } from 'ai'
import { z } from 'zod'
const getCurrentTime = tool({
description: 'Get the current time for a city',
inputSchema: z.object({
city: z.string(),
}),
execute: async ({ city }) => ({
city,
time: new Date().toLocaleTimeString(),
}),
})
const adk = createAdkProvider({
availableTools: { getCurrentTime },
})
await adk.prepareNano()
const { text } = await generateText({
model: adk(),
tools: { getCurrentTime },
prompt: 'What time is it in Warsaw?',
})
```
During streaming, the provider emits `tool-input-start`, `tool-input-delta`, `tool-input-end`, and `tool-call` stream parts when ADK surfaces function calls from the model.
Pass tools through the AI SDK `tools` option as usual; the provider bridges execution to JavaScript while ADK orchestrates the agent loop natively.
### Updating Tools at Runtime
Register tools when creating the provider so ADK can execute them from JavaScript:
```typescript
import { adk } from '@react-native-ai/adk'
const model = adk()
// Add or replace tools on an existing model instance
model.updateTools({
getCurrentTime,
})
```
To register executors at provider creation time:
```typescript
import { createAdkProvider } from '@react-native-ai/adk'
import { tool } from 'ai'
import { z } from 'zod'
const getCurrentTime = tool({
description: 'Get the current time for a city',
inputSchema: z.object({ city: z.string() }),
execute: async ({ city }) => ({
city,
time: new Date().toLocaleTimeString(),
}),
})
const adk = createAdkProvider({
availableTools: { getCurrentTime },
})
const model = adk()
model.updateTools({
getCurrentTime,
})
```
## Multimodal Input
Pass file parts in user messages using the standard AI SDK prompt format:
```typescript
import { adk } from '@react-native-ai/adk'
import { generateText } from 'ai'
await adk.prepareNano()
const { text } = await generateText({
model: adk(),
messages: [
{
role: 'user',
content: [
{ type: 'text', text: 'What is in this image?' },
{
type: 'file',
mediaType: 'image/jpeg',
data: base64Image,
},
],
},
],
})
```
Supported file data formats:
- **Base64 strings** - Raw base64 or `data:image/jpeg;base64,...` data URLs
- **`Uint8Array`** - Binary image data
> **Note**: File URLs (`file://` or HTTP) are not supported yet. Pass base64 or `Uint8Array` data directly.
## Structured Output
Generate JSON responses using AI SDK JSON mode:
```typescript
import { adk } from '@react-native-ai/adk'
import { generateText } from 'ai'
await adk.prepareNano()
const { text } = await generateText({
model: adk(),
prompt: 'Return a JSON object with name and age fields.',
responseFormat: { type: 'json' },
})
```
> **Note**: JSON schema constraints (`responseFormat.schema`) are not supported yet. Use JSON mode without a schema, or parse and validate the response in your app.
Streaming structured JSON is not supported by ADK yet.
## Available Options
Configure model behavior with generation options:
| Option | Type | Description |
| ------------- | ------ | -------------------------------------------------------- |
| `temperature` | number | Controls randomness |
| `maxTokens` | number | Maximum tokens to generate (`maxOutputTokens` in AI SDK) |
| `topP` | number | Nucleus sampling threshold |
| `topK` | number | Top-K sampling parameter |
Example:
```typescript
import { adk } from '@react-native-ai/adk'
import { generateText } from 'ai'
await adk.prepareNano()
const { text } = await generateText({
model: adk(),
prompt: 'Write a creative story',
temperature: 0.8,
maxOutputTokens: 500,
topP: 0.9,
topK: 40,
})
```
## Limitations
The following features are not yet supported:
| Feature | Status |
| ---------------------------------- | -------------------------------------------- |
| `responseFormat.schema` | Not supported - use JSON mode without schema |
| Streaming JSON | Not supported |
| `toolChoice: { type: 'required' }` | Ignored with a warning - defaults to auto |
| File URLs in multimodal prompts | Not supported - use base64 or `Uint8Array` |
| iOS / web | Android only |
---
url: /docs/llama/getting-started.md
---
import { PackageManagerTabs } from '@theme'
# Getting Started
The Llama provider enables you to run GGUF models directly on-device in React Native applications using [llama.rn](https://github.com/mybigday/llama.rn). This allows you to download and run any GGUF model from HuggingFace for privacy, performance, and offline capabilities.
## Installation
Install the Llama provider and its peer dependencies:
While you can use the Llama provider standalone, we recommend using it with the Vercel AI SDK for a much better developer experience. The AI SDK provides unified APIs, streaming support, and advanced features. To use with the AI SDK, you'll need v5+ and [required polyfills](../polyfills.md):
## Requirements
- **React Native >= 0.76.0** - Required for native module functionality
- **llama.rn >= 0.10.0** - The underlying llama.cpp bindings
## Expo Setup
For use with the Expo framework and CNG builds, you will need `expo-build-properties` to utilize iOS and OpenCL features. Simply add the following to your `app.json` or `app.config.js` file:
```javascript
module.exports = {
expo: {
// ...
plugins: [
// ...
[
'llama.rn',
// optional fields, below are the default values
{
enableEntitlements: true,
entitlementsProfile: 'production',
forceCxx20: true,
enableOpenCL: true,
},
],
],
},
}
```
For all other installation tips and tricks, refer to the [llama.rn Expo documentation](https://github.com/mybigday/llama.rn?tab=readme-ov-file#expo).
## Available Model Types
The Llama provider supports multiple model types:
| Model Type | Method | Use Case |
| --------------- | ---------------------------- | ----------------------------------- |
| Language Model | `llama.languageModel()` | Text generation, chat, reasoning |
| Embedding Model | `llama.textEmbeddingModel()` | Text embeddings for RAG, similarity |
| Speech Model | `llama.speechModel()` | Text-to-speech with vocoder |
## Basic Usage
Import the Llama provider and use it with the AI SDK:
```typescript
import { llama, downloadModel } from '@react-native-ai/llama'
import { streamText } from 'ai'
// Download model from HuggingFace - returns the file path
const modelPath = await downloadModel(
'ggml-org/SmolLM3-3B-GGUF/SmolLM3-Q4_K_M.gguf'
)
// Create model instance with the path
const model = llama.languageModel(modelPath)
// Initialize model (loads into memory)
await model.prepare()
const { textStream } = streamText({
model,
prompt: 'Explain quantum computing in simple terms',
})
for await (const delta of textStream) {
console.log(delta)
}
// Cleanup when done
await model.unload()
```
## Model ID Format
Models are identified using the HuggingFace format: `owner/repo/filename.gguf`
For example:
- `ggml-org/SmolLM3-3B-GGUF/SmolLM3-Q4_K_M.gguf`
- `Qwen/Qwen2.5-3B-Instruct-GGUF/qwen2.5-3b-instruct-q3_k_m.gguf`
- `lmstudio-community/gemma-2-2b-it-GGUF/gemma-2-2b-it-Q3_K_M.gguf`
You can find GGUF models on [HuggingFace](https://huggingface.co/models?library=gguf).
## Next Steps
- **[Model Management](./model-management.md)** - Complete guide to model lifecycle, downloading, and API reference
- **[Generating](./generating.md)** - Learn how to generate text, use multimodal inputs, and stream responses
- **[Embeddings](./embeddings.md)** - Generate text embeddings for RAG and similarity search
---
url: /docs/llama/generating.md
---
# Generating
You can generate responses using Llama models with the Vercel AI SDK's `generateText` or `streamText` functions.
## Requirements
- Models must be downloaded and prepared before use
- Sufficient device storage for model files (typically 1-4GB per model depending on quantization)
## Text Generation
```typescript
import { llama, downloadModel } from '@react-native-ai/llama'
import { generateText } from 'ai'
// Download model - returns the file path
const modelPath = await downloadModel('ggml-org/SmolLM3-3B-GGUF/SmolLM3-Q4_K_M.gguf')
const model = llama.languageModel(modelPath)
await model.prepare()
const result = await generateText({
model,
prompt: 'Explain quantum computing in simple terms',
})
console.log(result.text)
```
## Streaming
Stream responses for real-time output:
```typescript
import { llama, downloadModel } from '@react-native-ai/llama'
import { streamText } from 'ai'
// Download model - returns the file path
const modelPath = await downloadModel('ggml-org/SmolLM3-3B-GGUF/SmolLM3-Q4_K_M.gguf')
const model = llama.languageModel(modelPath)
await model.prepare()
const { textStream } = streamText({
model,
prompt: 'Write a short story about a robot learning to paint',
})
for await (const delta of textStream) {
console.log(delta)
}
```
## Tool Calling
You can enable tool calling for both `generateText` and `streamText` by passing tools to the AI SDK.
### Setup
Define tools using the AI SDK `tool` helper:
```typescript
import { tool } from 'ai'
import { z } from 'zod'
const getWeather = tool({
description: 'Get current weather information',
inputSchema: z.object({
city: z.string(),
}),
execute: async ({ city }) => {
return `Weather in ${city}: Sunny, 25°C`
},
})
```
### Basic Tool Usage
```typescript
import { llama, downloadModel } from '@react-native-ai/llama'
import { generateText } from 'ai'
const modelPath = await downloadModel('Qwen/Qwen2.5-3B-Instruct-GGUF/qwen2.5-3b-instruct-q3_k_m.gguf')
const model = llama.languageModel(modelPath)
await model.prepare()
const result = await generateText({
model,
prompt: 'What is the weather in Paris?',
tools: {
getWeather,
},
})
```
## Multimodal (Vision & Audio)
The Llama provider supports multimodal models that can process images and audio. To enable multimodal capabilities, provide a `projectorPath` when creating the model:
```typescript
import { llama, downloadModel } from '@react-native-ai/llama'
import { generateText } from 'ai'
const modelPath = await downloadModel('owner/repo/vision-model.gguf')
const model = llama.languageModel(modelPath, {
projectorPath: '/path/to/mmproj-model.gguf',
})
await model.prepare()
// Use with images
const result = await generateText({
model,
messages: [
{
role: 'user',
content: [
{ type: 'text', text: 'What do you see in this image?' },
{
type: 'file',
mediaType: 'image/jpeg',
data: 'file:///path/to/image.jpg', // or base64 data URL
},
],
},
],
})
```
### Supported Formats
- **Images**: JPEG, PNG, BMP, GIF, TGA, HDR, PIC, PNM
- **Audio**: WAV, MP3
### Supported URL Patterns
- `file://` - Local file paths
- `data:` - Base64 data URLs
> **Note**: HTTP URLs are not yet supported. Use local files or base64 data URLs.
## Reasoning Models
Models that support reasoning (like DeepSeek-R1) automatically handle `` tags. The reasoning content is separated from the main response:
```typescript
import { llama, downloadModel } from '@react-native-ai/llama'
import { generateText } from 'ai'
const modelPath = await downloadModel('owner/repo/deepseek-r1.gguf')
const model = llama.languageModel(modelPath)
await model.prepare()
const result = await generateText({
model,
prompt: 'Solve this math problem step by step: 2x + 5 = 13',
})
// Access main response
console.log(result.text)
// Access reasoning content (if present)
console.log(result.reasoning)
```
When streaming, reasoning tokens are emitted separately via `reasoning-start`, `reasoning-delta`, and `reasoning-end` events.
## JSON Mode
Generate structured JSON responses:
```typescript
import { llama, downloadModel } from '@react-native-ai/llama'
import { generateObject } from 'ai'
import { z } from 'zod'
const modelPath = await downloadModel('ggml-org/SmolLM3-3B-GGUF/SmolLM3-Q4_K_M.gguf')
const model = llama.languageModel(modelPath)
await model.prepare()
const { object } = await generateObject({
model,
schema: z.object({
name: z.string(),
age: z.number(),
hobbies: z.array(z.string()),
}),
prompt: 'Generate a fictional person profile',
})
console.log(object)
// { name: 'Alice', age: 28, hobbies: ['reading', 'hiking'] }
```
## Available Options
Configure model behavior with generation options:
| Option | Type | Description |
| --- | --- | --- |
| `temperature` | number (0-1) | Controls randomness. Higher = more creative |
| `maxTokens` | number | Maximum tokens to generate |
| `topP` | number (0-1) | Nucleus sampling threshold |
| `topK` | number | Top-K sampling parameter |
| `presencePenalty` | number | Penalize tokens based on presence |
| `frequencyPenalty` | number | Penalize tokens based on frequency |
| `stopSequences` | string[] | Stop generation at these sequences |
| `seed` | number | Random seed for reproducibility |
Example with all options:
```typescript
import { llama, downloadModel } from '@react-native-ai/llama'
import { generateText } from 'ai'
const modelPath = await downloadModel('ggml-org/SmolLM3-3B-GGUF/SmolLM3-Q4_K_M.gguf')
const model = llama.languageModel(modelPath)
await model.prepare()
const result = await generateText({
model,
prompt: 'Write a creative story',
temperature: 0.8,
maxTokens: 500,
topP: 0.9,
topK: 40,
presencePenalty: 0.5,
frequencyPenalty: 0.5,
stopSequences: ['THE END'],
seed: 42,
})
```
## Model Configuration Options
When creating a model instance, you can configure llama.rn specific options via `contextParams`:
```typescript
const model = llama.languageModel(modelPath, {
contextParams: {
n_ctx: 4096, // Context size (default: 2048, or 4096 for multimodal)
n_gpu_layers: 99, // Number of GPU layers (default: 99)
},
})
```
For multimodal models:
```typescript
const model = llama.languageModel(modelPath, {
projectorPath: '/path/to/mmproj.gguf', // Required for multimodal
projectorUseGpu: true, // Use GPU for multimodal (default: true)
contextParams: {
n_ctx: 4096,
n_gpu_layers: 99,
},
})
```
---
url: /docs/llama/embeddings.md
---
# Embeddings
Generate text embeddings for RAG (Retrieval-Augmented Generation), semantic search, and similarity comparisons using the Llama provider.
## Requirements
- An embedding-capable GGUF model (models trained for embeddings)
- Models must be downloaded and prepared before use
## Basic Usage
```typescript
import { llama, downloadModel } from '@react-native-ai/llama'
import { embed } from 'ai'
// Download embedding model - returns the file path
const modelPath = await downloadModel('owner/repo/embedding-model.gguf')
// Create embedding model with the path
const model = llama.textEmbeddingModel(modelPath)
await model.prepare()
// Generate embedding for a single text
const { embedding } = await embed({
model,
value: 'What is machine learning?',
})
console.log(embedding) // [0.123, -0.456, ...]
```
## Batch Embeddings
Generate embeddings for multiple texts:
```typescript
import { llama, downloadModel } from '@react-native-ai/llama'
import { embedMany } from 'ai'
const modelPath = await downloadModel('owner/repo/embedding-model.gguf')
const model = llama.textEmbeddingModel(modelPath)
await model.prepare()
const { embeddings } = await embedMany({
model,
values: [
'Machine learning is a type of AI',
'Deep learning uses neural networks',
'Natural language processing handles text',
],
})
console.log(embeddings.length) // 3
console.log(embeddings[0].length) // Embedding dimension (e.g., 384, 768)
```
## Model Configuration
Configure the embedding model with specific options:
```typescript
const model = llama.textEmbeddingModel(modelPath, {
normalize: -1, // Normalization mode (default: -1)
contextParams: {
n_ctx: 2048, // Context size (default: 2048)
n_gpu_layers: 99, // GPU layers (default: 99)
n_parallel: 8, // Parallel embeddings (default: 8)
},
})
```
### Options
| Option | Type | Default | Description |
| --- | --- | --- | --- |
| `normalize` | number | -1 | Embedding normalization mode |
| `contextParams.n_ctx` | number | 2048 | Context window size |
| `contextParams.n_gpu_layers` | number | 99 | GPU layers for acceleration |
| `contextParams.n_parallel` | number | 8 | Number of parallel embeddings |
## Cleanup
Release resources when done:
```typescript
await model.unload() // Release from memory
```
---
url: /docs/llama/reranking.md
---
# Reranking
Rank documents based on their relevance to a query using the Llama provider. This is useful for improving search results and implementing retrieval-augmented generation (RAG) systems.
## Requirements
- A reranker GGUF model (models trained for ranking)
- Models must be downloaded and prepared before use
## Basic Usage
```typescript
import { llama, downloadModel } from '@react-native-ai/llama'
import { rerank } from 'ai'
// Download reranker model - returns the file path
const modelPath = await downloadModel(
'jinaai/jina-reranker-v2-base-multilingual-GGUF/jina-reranker-v2-base-multilingual-Q4_K_M.gguf',
)
// Create rerank model with the path
const model = llama.rerankModel(modelPath)
await model.prepare()
// Rerank documents based on relevance to query
const { ranking } = await rerank({
model,
query: 'What is artificial intelligence?',
documents: [
'AI is a branch of computer science.',
'The weather is nice today.',
'Machine learning is a subset of AI.',
'I like pizza.',
],
})
// Results are sorted by relevance (highest first)
ranking.forEach((result, rank) => {
console.log(`Rank ${rank + 1}:`, {
relevanceScore: result.relevanceScore,
index: result.index, // Original index in the documents array
})
})
```
## Limiting Results
Use `topN` to limit the number of returned documents:
```typescript
const { ranking } = await rerank({
model,
query: 'What is artificial intelligence?',
documents: ['doc1', 'doc2', 'doc3', 'doc4', 'doc5'],
topN: 3,
})
```
## Model Configuration
Configure the rerank model with specific options:
```typescript
const model = llama.rerankModel(modelPath, {
normalize: 1, // Score normalization (default: from model config)
contextParams: {
n_ctx: 2048, // Context size (default: 2048)
n_gpu_layers: 99, // GPU layers (default: 99)
},
})
```
### Options
| Option | Type | Default | Description |
| --- | --- | --- | --- |
| `normalize` | number | model default | Score normalization mode |
| `contextParams.n_ctx` | number | 2048 | Context window size |
| `contextParams.n_gpu_layers` | number | 99 | GPU layers for acceleration |
## Result Format
Each result in the ranking array contains:
| Property | Type | Description |
| --- | --- | --- |
| `relevanceScore` | number | Relevance score (higher = more relevant) |
| `index` | number | Index of the document in the original input array |
## Cleanup
Release resources when done:
```typescript
await model.unload() // Release from memory
```
---
url: /docs/llama/model-management.md
---
# Model Management
This guide covers the complete lifecycle of Llama models - from discovery and download to cleanup and removal.
## Finding Models
Unlike MLC which has a prebuilt set of models, the Llama provider can run any GGUF model from HuggingFace. You can browse available models at [HuggingFace GGUF Models](https://huggingface.co/models?library=gguf).
### Recommended Models
Here are some popular models that work well on mobile devices:
| Model ID | Size | Best For |
| ----------------------------------------------------------------- | ------ | -------------------------------- |
| `ggml-org/SmolLM3-3B-GGUF/SmolLM3-Q4_K_M.gguf` | ~1.8GB | Balanced performance and quality |
| `Qwen/Qwen2.5-3B-Instruct-GGUF/qwen2.5-3b-instruct-q3_k_m.gguf` | ~1.9GB | General conversations |
| `lmstudio-community/gemma-2-2b-it-GGUF/gemma-2-2b-it-Q3_K_M.gguf` | ~2.3GB | High quality responses |
> **Note**: When selecting models, consider quantization levels (Q3, Q4, Q5, etc.). Lower quantization = smaller size but potentially lower quality. Q4_K_M is a good balance for mobile.
## Model Lifecycle
### Downloading Models
Models are downloaded from HuggingFace using the storage API. The `downloadModel` function returns the path to the downloaded file:
```typescript
import { downloadModel } from '@react-native-ai/llama'
const modelPath = await downloadModel('ggml-org/SmolLM3-3B-GGUF/SmolLM3-Q4_K_M.gguf')
console.log('Downloaded to:', modelPath)
```
You can track download progress:
```typescript
const modelPath = await downloadModel(
'ggml-org/SmolLM3-3B-GGUF/SmolLM3-Q4_K_M.gguf',
(progress) => {
console.log(`Download: ${progress.percentage}%`)
}
)
```
### Checking Download Status
Check if a model is already downloaded:
```typescript
import { isModelDownloaded, getModelPath } from '@react-native-ai/llama'
const modelId = 'ggml-org/SmolLM3-3B-GGUF/SmolLM3-Q4_K_M.gguf'
if (await isModelDownloaded(modelId)) {
// Model already downloaded, get its path
const modelPath = getModelPath(modelId)
}
```
### Creating Model Instances
Create model instances using the provider methods. Pass the model path (from `downloadModel()` or `getModelPath()`):
```typescript
import { llama, downloadModel } from '@react-native-ai/llama'
// Download and get the path
const modelPath = await downloadModel('ggml-org/SmolLM3-3B-GGUF/SmolLM3-Q4_K_M.gguf')
// Create model with the path
const languageModel = llama.languageModel(modelPath)
// Embedding model
const embeddingModel = llama.textEmbeddingModel(modelPath)
// Speech model (requires vocoder)
const speechModel = llama.speechModel(modelPath, {
vocoderPath: '/path/to/vocoder.gguf'
})
```
With configuration options:
```typescript
const model = llama.languageModel(modelPath, {
contextParams: {
n_ctx: 4096, // Context window size (default: 2048)
n_gpu_layers: 99, // GPU layers for acceleration (default: 99)
},
})
```
### Preparing Models
After creating a model instance, prepare it for inference (loads it into memory):
```typescript
await model.prepare()
```
> [!TIP]
> Calling `prepare()` ahead of time is recommended for optimal performance. If not called, the model will auto-prepare when first used, but a warning will be logged.
### Using Models
Once prepared, use the model with AI SDK functions:
```typescript
import { streamText } from 'ai'
const { textStream } = streamText({
model,
prompt: 'Hello! Introduce yourself briefly.',
})
for await (const delta of textStream) {
console.log(delta)
}
```
### Accessing the Native Context
For advanced usage, you can access the underlying `LlamaContext`:
```typescript
// Ensure the model is prepared before accessing the context
await model.prepare()
const context = model.getContext()
if (!context) {
throw new Error(
'Model context is not available. Make sure prepare() has completed and the model has not been unloaded.',
)
}
```
### Unloading Models
Unload the model from memory to free resources:
```typescript
await model.unload()
```
## API Reference
### `llama`
Default provider instance with the following methods:
### `llama.languageModel(modelPath, options?)`
Creates a language model instance.
- `modelPath`: Path to the model file (from `downloadModel()` or `getModelPath()`)
- `options`:
- `projectorPath`: Path to multimodal projector for vision/audio support
- `projectorUseGpu`: Use GPU for multimodal processing (default: `true`)
- `contextParams`: llama.rn context parameters
- `n_ctx`: Context size (default: 2048, or 4096 for multimodal)
- `n_gpu_layers`: Number of GPU layers (default: 99)
### `llama.textEmbeddingModel(modelPath, options?)`
Creates an embedding model instance.
- `modelPath`: Path to the model file (from `downloadModel()` or `getModelPath()`)
- `options`:
- `normalize`: Normalize embeddings (default: -1)
- `contextParams`: llama.rn context parameters
- `n_ctx`: Context size (default: 2048)
- `n_gpu_layers`: Number of GPU layers (default: 99)
- `n_parallel`: Parallel embeddings (default: 8)
### `llama.speechModel(modelPath, options)`
Creates a speech model instance for text-to-speech.
- `modelPath`: Path to the model file (from `downloadModel()` or `getModelPath()`)
- `options`:
- `vocoderPath`: **Required** - Path to vocoder model file
- `vocoderBatchSize`: Batch size for vocoder processing
- `contextParams`: llama.rn context parameters
### Storage Functions
These functions are exported directly for model management. Models are stored in `${DocumentDir}/llama-models/`.
### `downloadModel(modelId, progressCallback?)`
Download a model from HuggingFace.
- `modelId`: Model identifier in format `owner/repo/filename.gguf`
- `progressCallback`: Optional callback with `{ percentage: number }`
- Returns: `Promise` - Path to the downloaded model file
### `getModelPath(modelId)`
Get the local file path for a model (without downloading).
- `modelId`: Model identifier in format `owner/repo/filename.gguf`
- Returns: `string` - Path where the model file is/would be stored
### `isModelDownloaded(modelId)`
Check if a model is downloaded.
- `modelId`: Model identifier in format `owner/repo/filename.gguf`
- Returns: `Promise`
### Model Instance Methods
All model types share these common methods:
- `prepare()`: Initialize/load model into memory
- `getContext()`: Get the underlying LlamaContext (for advanced usage)
- `unload()`: Release model from memory
---
url: /docs/mlc/getting-started.md
---
import { PackageManagerTabs } from '@theme'
# Getting Started
The MLC provider enables you to run large language models directly on-device in React Native applications. This includes popular models like Llama, Phi-3, Mistral, and Qwen that run entirely on-device for privacy, performance, and offline capabilities.
## Installation
Install the MLC provider:
While you can use the MLC provider standalone, we recommend using it with the Vercel AI SDK for a much better developer experience. The AI SDK provides unified APIs, streaming support, and advanced features. To use with the AI SDK, you'll need v5+ and [required polyfills](../polyfills.md):
## Requirements
- **React Native New Architecture** - Required for native module functionality
- **Increased Memory Limit capability** - Required for large model loading
## Running Your Application
:::danger Physical Device Required
You must run your application on a **physical iOS device** or using **Mac (Designed for iPad)** destination in Xcode, as prebuilt model binaries will not work in the iOS Simulator.
:::
## Configuration
### Expo Config Plugin
For Expo projects, add the MLC config plugin to automatically configure the increased memory limit capability:
```json
{
"expo": {
"plugins": ["@react-native-ai/mlc"]
}
}
```
The plugin automatically adds the `com.apple.developer.kernel.increased-memory-limit` entitlement to your iOS app, which is required to run large language models that exceed the default memory limits.
After adding the plugin, run:
```bash
npx expo prebuild --clean
```
### Manual Installation
If you're not using Expo or prefer manual configuration, add the "Increased Memory Limit" capability in Xcode:
1. Open your iOS project in Xcode
2. Navigate to your target's **Signing & Capabilities** tab
3. Click **+ Capability** and add "Increased Memory Limit"
## Basic Usage
Import the MLC provider and use it with the AI SDK:
```typescript
import { mlc } from '@react-native-ai/mlc'
import { generateText } from 'ai'
const model = mlc.languageModel('Llama-3.2-3B-Instruct')
await model.download()
await model.prepare()
const result = await generateText({
model,
prompt: 'Explain quantum computing in simple terms',
})
```
## Next Steps
- **[Model Management](./model-management.md)** - Complete guide to model lifecycle, available models, and API reference
- **[Generating](./generating.md)** - Learn how to generate text and stream responses
---
url: /docs/mlc/generating.md
---
# Generating
You can generate responses using MLC models with the Vercel AI SDK's `generateText`, `streamText`, or `generateObject` functions.
## Requirements
- Models must be downloaded and prepared before use
- Sufficient device storage for model files (1-4GB per model)
## Text Generation
```typescript
import { mlc } from '@react-native-ai/mlc';
import { generateText } from 'ai';
// Create and prepare model
const model = mlc.languageModel('Llama-3.2-3B-Instruct');
await model.prepare();
const result = await generateText({
model,
prompt: 'Explain quantum computing in simple terms'
});
console.log(result.text);
```
## Streaming
Stream responses for real-time output:
```typescript
import { mlc } from '@react-native-ai/mlc';
import { streamText } from 'ai';
// Create and prepare model
const model = mlc.languageModel('Llama-3.2-3B-Instruct');
await model.prepare();
const { textStream } = await streamText({
model,
prompt: 'Write a short story about a robot learning to paint'
});
for await (const delta of textStream) {
console.log(delta);
}
```
## Structured Output
Generate structured data that conforms to a specific schema:
```typescript
import { generateObject } from 'ai';
import { mlc } from '@react-native-ai/mlc';
import { z } from 'zod';
// Create and prepare model
const model = mlc.languageModel('Llama-3.2-3B-Instruct');
await model.prepare();
const schema = z.object({
name: z.string(),
description: z.string()
});
const result = await generateObject({
model,
prompt: 'Who are you? Please identify yourself and your capabilities.',
schema
});
console.log(result.object);
```
## Available Options
Configure model behavior with generation options:
- `temperature` (0-1): Controls randomness. Higher values = more creative, lower = more focused
- `maxTokens`: Maximum number of tokens to generate
- `topP` (0-1): Nucleus sampling threshold
- `topK`: Top-K sampling parameter
You can pass selected options with `generateText`, `streamText`, or `generateObject` as follows:
```typescript
import { mlc } from '@react-native-ai/mlc';
import { generateText } from 'ai';
// Create and prepare model
const model = mlc.languageModel('Llama-3.2-3B-Instruct');
await model.prepare();
const result = await generateText({
model,
prompt: 'Write a creative story',
temperature: 0.8,
maxTokens: 500,
topP: 0.9,
});
```
---
url: /docs/mlc/model-management.md
---
# Model Management
This guide covers the complete lifecycle of MLC models - from discovery and download to cleanup and removal.
## Available Models
The package includes a prebuilt runtime optimized for the following models:
| Model ID | Size | Best For |
|----------|------|----------|
| `Qwen2.5-0.5B-Instruct` | ~600MB | Fast responses, basic conversations |
| `Llama-3.2-1B-Instruct` | ~1.2GB | Balanced performance and quality |
| `Llama-3.2-3B-Instruct` | ~2GB | High quality responses, complex reasoning |
| `Phi-3.5-mini-instruct` | ~2.3GB | Code generation, technical tasks |
> **Note**: These models use q4f16_1 quantization (4-bit weights, 16-bit activations) optimized for mobile devices. For other models, you'll need to build MLC from source (documentation coming soon).
## Model Lifecycle
### Discovering Models
Get the list of models included in the runtime:
```typescript
import { MLCEngine } from '@react-native-ai/mlc';
const models = await MLCEngine.getModels();
console.log('Available models:', models);
// Output: [{ model_id: 'Llama-3.2-1B-Instruct' }, ...]
```
### Creating Model Instance
Create a model instance using the `mlc.languageModel()` method:
```typescript
import { mlc } from '@react-native-ai/mlc';
const model = mlc.languageModel('Llama-3.2-1B-Instruct');
```
### Downloading Models
Models need to be downloaded to the device before use.
```typescript
import { MLCEngine } from '@react-native-ai/mlc';
await model.download();
console.log('Download complete!');
```
You can track download progress:
```typescript
await model.download((event) => {
console.log(`Download: ${event.percentage}%`);
});
```
### Preparing Models
After downloading, prepare the model for inference:
```typescript
await model.prepare();
```
### Using Models
Once prepared, use the model with AI SDK functions:
```typescript
import { generateText } from 'ai';
const result = await generateText({
model,
prompt: 'Hello! Introduce yourself briefly.',
});
console.log(result.text);
```
### Unloading Models
Unload the current model from memory to free resources:
```typescript
await model.unload();
```
### Removing Downloaded Models
Delete downloaded model files to free storage:
```typescript
await model.remove();
```
---
url: /docs/json-ui/getting-started.md
---
import { PackageManagerTabs } from '@theme'
# Getting Started
Lightweight JSON UI tooling for React Native with the Vercel AI SDK. The model builds and updates a UI by calling tools (e.g. add node, set props); you render the resulting spec with `GenerativeUIView`.
## What this package provides
- **Component/style registry** — `GEN_UI_NODE_HINTS`, `GEN_UI_STYLES`, `GEN_UI_NODE_NAMES` for tools and prompts
- **Tool set** — `createGenUITools` for JSON UI mutation (get/add/delete nodes, set props, reorder)
- **System prompt** — `buildGenUISystemPrompt` for model instructions
- **Renderer** — `GenerativeUIView` passes `GEN_UI_STYLES` (overridable) to the default `GenUINode` and supports a custom node renderer
## Why this package?
There exists a great library for streaming interfaces: [`json-render`](https://github.com/vercel-labs/json-render). The full specification is provided in the ['Prior art'](./prior-art.md) section, but **TL;DR**: this library - `@react-native-ai/json-ui` - is the choice for small language models (e.g. parameters in the order of magnitude of 3B), which is usually the case if you are running inference locally, on-device. If you are using a cloud provider, consider `json-render` instead.
## Requirements
- React Native app
- Vercel AI SDK tool-calling flow (`streamText`, `generateText`, etc.)
- A model that supports tool calling
## Installation
## Quick Start
```ts
import { streamText } from 'ai'
import {
buildGenUISystemPrompt,
createGenUITools,
} from '@react-native-ai/json-ui'
const tools = createGenUITools({
contextId: chatId,
getSpec: (id) => getSpecForChat(id),
updateSpec: (id, nextSpec) => setSpecForChat(id, nextSpec),
toolWrapper: (toolName, execute) => async (args) => {
console.log('Executing tool', toolName, args)
return execute(args)
},
})
const result = streamText({
model,
messages,
tools,
system: buildGenUISystemPrompt({
additionalInstructions:
'Your name is John. Keep responses short. Ask follow-up questions when UI intent is unclear.',
}),
})
```
Finally, render the spec set by `updateSpec` in your app with `GenerativeUIView` (see [Generative UI View](./view.md)):
```tsx
```
For a full usage example, see [this file](https://github.com/callstackincubator/ai/tree/main/generative-ui/apps/expo-example/src/store/chatStore.ts).
## Registries
The package exports these registry constants (used by tools and the default renderer):
- `GEN_UI_NODE_NAMES` — canonical node type names (Text, Paragraph, Label, Heading, Button, TextInput)
- `GEN_UI_NODE_HINTS` — short descriptions for each node type (for prompts)
- `GEN_UI_NODE_NAMES_THAT_SUPPORT_CHILDREN` — node types that can have children
- `GEN_UI_STYLES` — zod schemas for style props (flex, padding, gap, backgroundColor, color, etc.)
- `GEN_UI_STYLE_HINTS` — metadata for style keys (for prompt text)
## Notes
- Style validation is schema-based (zod) via `GEN_UI_STYLES`.
- The package is intentionally minimal and tuned for small-model tool loops.
---
url: /docs/json-ui/tools.md
---
# Tools
`createGenUITools` returns a set of tool definitions the model can call to read and mutate a JSON UI spec.
## createGenUITools(options)
Creates tools that operate on a spec with shape `{ root, elements }`. Options:
| Option | Required | Description |
| -------------------------------- | -------- | ----------------------------------------------------------------------- |
| `contextId` | Yes | String key for the current conversation/context |
| `getSpec(contextId)` | Yes | Return current spec or `null` |
| `updateSpec(contextId, spec)` | Yes | Persist the updated spec |
| `toolWrapper(toolName, execute)` | Yes | Wrapper for every tool execution (logging, error handling, telemetry) |
| `createId` | No | Id factory for new nodes (default: generates `UI-{timestamp}-{random}`) |
| `rootId` | No | Root node id (default: `"root"`) |
| `nodeHints` | No | Override component registry used in prompts |
| `nodeNamesThatSupportChildren` | No | Override list of node types that can have children |
### Tool list
- **getUIRootNode** — Return the root node id and element
- **getUINode** — Return a node by id
- **getUILayout** — Return layout (root + children structure)
- **getAvailableUINodes** — List available node types and hints
- **setUINodeProps** — Set props on a node (`{ id, props, replace? }`; default merge, use `replace: true` to replace all)
- **deleteUINode** — Remove a node
- **addUINode** — Add a node (`{ parentId?, type, props? }`; omit `parentId` to use root)
- **reorderUINodes** — Move a sibling by index (`nodeId`, `offset`; negative = earlier, positive = later; clamped to valid range)
All mutations are serialized so concurrent tool calls do not interleave writes.
## buildGenUISystemPrompt(options?)
Builds the reusable system instructions for JSON UI tooling. Use as the `system` option for `streamText` / `generateText`.
Options:
| Option | Default | Description |
| ------------------------------------ | ------- | ---------------------------------------------------------------- |
| `additionalInstructions` | — | App-specific text appended to the prompt |
| `requireLayoutReadBeforeAddingNodes` | `true` | Whether to instruct the model to read layout before adding nodes |
| `styleHints` | — | Override style metadata used in the prompt text |
Example:
```ts
system: buildGenUISystemPrompt({
additionalInstructions:
'Your name is John. Prefer short labels. Use Button for primary actions only.',
styleHints: {
borderRadius: { type: 'number', description: 'Border radius in px.' },
},
})
```
---
url: /docs/json-ui/view.md
---
# Generative UI View
`GenerativeUIView` renders a JSON UI spec in React Native. The default node renderer (`GenUINode`) receives style validators from the view; you can override styles or supply a custom renderer.
For a full usage example, see [this file](https://github.com/callstackincubator/ai/tree/main/generative-ui/apps/expo-example/src/screens/ChatScreen/ChatMessages.tsx).
## Basic usage
```tsx
import { GenerativeUIView } from '@react-native-ai/json-ui'
;
```
## Props
| Prop | Type | Description |
| --------------------- | -------------------------------------------- | -------------------------------------------------------------------------------------------------------------------------------------------------- |
| `spec` | `{ root, elements }` or `null` / `undefined` | The UI spec to render |
| `loading` | `boolean` | Optional; shows loading placeholder when truthy and spec is empty |
| `showCollapsibleJSON` | `boolean` | Optional; shows an expandable JSON debug panel |
| `styles` | object | Optional; merged with default `GEN_UI_STYLES` and passed to `GenUINode` |
| `GenUINodeComponent` | component | Optional; custom component to render the tree; receives `{ nodeId, elements, styles }`; delegate to default `GenUINode` for nodes you don’t handle |
## Styles from GenerativeUIView
The default `GenUINode` does not import `GEN_UI_STYLES` itself. `GenerativeUIView` merges the registry default with any `styles` prop and passes the result down as the `styles` prop to `GenUINode`. All style validation is driven by what the view provides, so you can pass custom validators:
```tsx
import { z } from 'zod'
import { GenerativeUIView, GEN_UI_STYLES } from '@react-native-ai/json-ui'
;
```
## Custom GenUINode
You can supply your own node renderer and reuse the library’s style/prop parsing via `parseGenUIElementProps`. For one type render a custom component; for everything else use the default `GenUINode`. Pass `GenUINodeComponent` through so custom types work at any depth.
Example: custom `Badge` type, default renderer for the rest.
```tsx
import { View, Text, StyleSheet } from 'react-native'
import {
GenerativeUIView,
GenUINode,
parseGenUIElementProps,
type GenUINodeProps,
} from '@react-native-ai/json-ui'
const BADGE_TYPE = 'Badge'
function CustomGenUINode({
nodeId,
elements,
styles,
}: GenUINodeProps) {
const element = elements[nodeId]
if (!element) return null
if (element.type === BADGE_TYPE) {
const { baseStyle, text } = parseGenUIElementProps(element, styles, {
nodeId,
type: BADGE_TYPE,
})
return (
{text ?? ''}
)
}
return (
)
}
const customStyles = StyleSheet.create({
badge: {
alignSelf: 'flex-start',
paddingHorizontal: 8,
paddingVertical: 4,
borderRadius: 12,
},
badgeText: { fontSize: 12, color: '#fff' },
})
// Use the custom renderer; styles still come from the view (default or overridden).
```
`parseGenUIElementProps(element, styleValidators, options?)` returns `{ baseStyle, text, label, props }` and runs the same validation and prop parsing as the default renderer. Use it for custom node types that should respect the same style schema.
---
url: /docs/json-ui/prior-art.md
---
# Prior Art
[json-render](https://github.com/vercel-labs/json-render) is an alternative that predates this library. It provides React and React Native integration and works with the [AI SDK](https://github.com/vercel/ai). Its design:
- The LLM **streams** the UI in a predefined format; a stream parser consumes the output.
- A **long system prompt** describes that format and includes examples.
That works well for **large language models** (e.g. cloud APIs). For **on-device, small models** (e.g. Apple Foundation Models with limited context), you run into:
1. **Context size** — Small models often have 4K-token windows (such as Apple Foundation having a 4096 token limit). A long system prompt plus conversation leaves little room; you end up summarizing or truncating, if you even fit into the window at all.
2. **Task complexity** — json-render supports rich actions and state. For small models (e.g. 3B parameters), generating a correct static UI is already hard; a simpler, tool-based flow is more reliable.
## How this package differs
- **Tool calling instead of streaming UI** — The model emits small JSON payloads by calling tools (add node, set props, etc.). Each step is small and easier for the model to get right.
- **Narrower feature set** — Focus on static UI building first, so smaller models can complete the task. More features will be added later.
Choose **@react-native-ai/json-ui** when you run small models on-device; consider **json-render** when using cloud providers or larger models.
---
url: /index.md
---